
Yogurt chocolate bean Cupcake
I like the sour and sweet taste and the silky taste! This cake tastes like a light cheese cake. Although it lacks the fragrance of cheese, it has the smoothness of yogurt and is mixed with a strong aroma of chocolate, which makes this cake more refreshing and tastes sweet but not greasy!This cake has no shrinkage and cracking. This is the amount of nine small paper cups. And the temperature is only a reference value. It still depends on the performance of your own oven. If you can't distinguish neutral foaming, you can directly apply it to dry foaming.

Step 1 . First, prepare two mixing basins, and keep all equipment containers free of oil and water. The materials are ready for use! (my yogurt here is self-made and sugar free. If your yogurt contains sugar, please reduce the sugar in the formula as appropriate.)

Step 2 . The egg yolk and protein are respectively put into two containers (here you can also use the egg yolk separator to avoid mixing the egg yolk into the protein, oh, not at all)

Step 3 . Pour the edible oil into the egg yolk and stir it evenly with a manual egg beater. (just mix it until you can't see the oil)

Step 4 . Then pour the yogurt fermented by Chuanxiu children's bacteria into the mixed egg paste and stir it again! (yoghurt must be the kind of thick yoghurt. If not, please reduce the amount of yoghurt.)

Step 5 . Pour the sifted low flour and corn starch into the mixed egg paste and stir well. Stir until there is no particle or dry powder! Put the egg mixture aside after stirring. (the egg paste with corn starch is more difficult to defoaming and tastes more delicate)

Step 6 . Next, beat the egg whites. Drop a few drops of lemon juice (or white vinegar) into the egg whites until the volume is slightly larger. When the surface is fish eye blister, add 20g of fine granulated sugar (add the fine granulated sugar in three times) and continue to beat at low speed

Step 7 . When the foam is not visible on the surface, add 20g of fine granulated sugar for the second time, and then beat it with an egg beater at a medium speed. (white granulated sugar can play a role of stability)

Step 8 . When the protein has obvious lines and is not easy to disappear, add the remaining white granulated sugar for the third time, turn the egg beater to high speed for one minute, and then turn to low speed for two minutes.

Step 9 . Whisk the egg whites until they are in the shape of chicken tail, and the buckled pot is in a state without sliding (try to whisk them in place at every corner). If you are afraid of shrinking, you can whisk them until they are hard and dry.
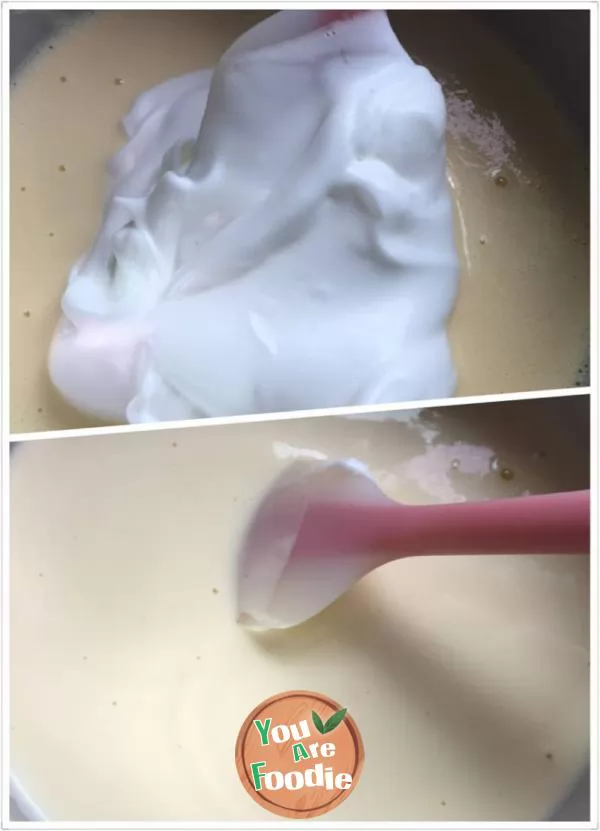
Step 10 . Whisk the egg whites until they are in the shape of chicken tail, and the buckled pot is in a state without sliding (try to whisk them in place at every corner). If you are afraid of shrinking, you can whisk them until they are hard and dry.

Step 11 . Whisk the egg whites until they are in the shape of chicken tail, and the buckled pot is in a state without sliding (try to whisk them in place at every corner). If you are afraid of shrinking, you can whisk them until they are hard and dry.

Step 12 . Preheat the oven at 160 ° C for 10 minutes. At the same time, pour the mixed egg paste into a paper cup. Each paper cup is about 8% full. Then throw it hard from top to bottom, shake out the bubbles inside, and sprinkle chocolate beans for baking. (chocolate beans are heat-resistant)

Step 13 . Put the prepared egg paste into the preheated oven and heat it up and down at 140 ℃ for 40 minutes (the temperature here should be adjusted according to the oven). At last, pay attention to observation to avoid over baking.

Step 14 . No shrinkage, no cracking!

Step 15 . You can eat!
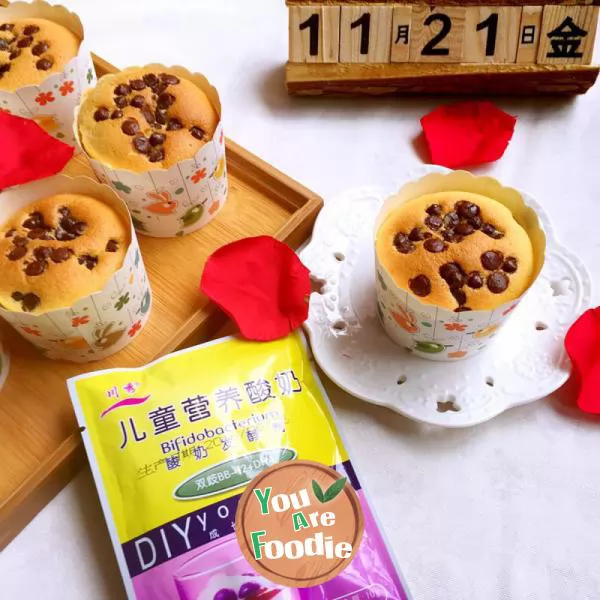
Step 16 . Finished product drawing
* Information is provided from the Internet, If there is a copyright infringement, Please contact administratoryouarefoodie.com, We will deal with as soon as possible, Thank you!
![[Cantonese cuisine] soup of cold melon, soybean and pork bones](/update/images/foods/60/7560/97560/1653360787_645608.jpg_s.jpg.webp)
![[Suzhou cuisine]: yongheyuan assorted jelly](/update/images/foods/26/4526/74526/1653358591_697463.jpg_s.jpg.webp)