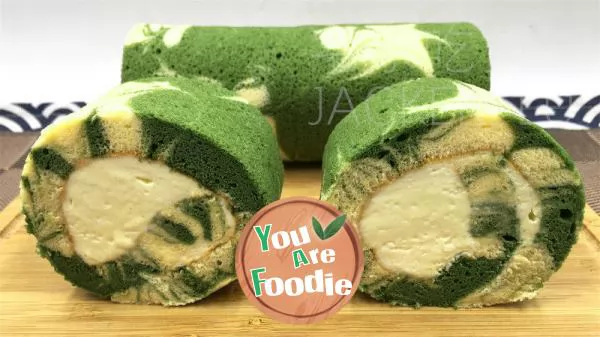
Matcha marble patterned cake roll, with a subtle bitterness and sweetness that complement each other, leaving a lasting impression.
Today I made a matcha marble patterned cake roll, where the slight bitterness of matcha complements the sweet cake body, leaving a lasting impression. The unique pattern of marble, rich aroma of matcha, soft and delicate texture, mellow taste, melts in the mouth, as if you are in the midst of a tea garden, enjoying a fresh and natural atmosphere.1. Choosing high-quality matcha powder will result in better color and taste of the finished product.2. Freeze egg whites 15 minutes in advance, add lemon juice, and beat to make them more stable.3. Wait until the cake is completely cooled, then spread the cream. If there is still some warmth, the cream will melt.

Step 1 . 4 eggs, separate the egg white and yolk for later use, freeze the egg white for 15 minutes for later use.

Step 2 . Make matcha batter, mix 30g of milk and 20g of corn oil until evenly emulsified.

Step 3 . Add 10 grams of low gluten flour, 6 grams of matcha powder, and 2 egg yolks in sequence, and stir until the batter is even and smooth.

Step 4 . Make original batter again, 30 grams of milk and 20 grams of corn oil, stir until evenly emulsified. Add 30g of low gluten flour and 2 egg yolks in sequence, stir until the batter is evenly and smooth.

Step 5 . 4 egg whites, 5 grams of lemon juice, beaten into large fish eye shaped bubbles. Note: Freezing egg whites 15 minutes in advance will make them more stable when beaten.

Step 6 . 45 grams of white sugar, divided into three parts: coarse, medium, and fine. Add and beat until it forms a large, elastic hook.

Step 7 . Take 1/4 of the original batter and 1/4 of the matcha batter and add them separately.

Step 8 . Stir until the color is uniform.

Step 9 . Take 1/4 of each protein paste and add it to the two types of batter separately.

Step 10 . Stir until the color is uniform.

Step 11 . A little

Step 12 . Place oil paper or cloth on the baking tray, squeeze in the original batter and matcha batter at intervals.

Step 13 . Use chopsticks to draw marble patterns and shake twice to remove large bubbles.

Step 14 . Preheat the oven to 160 ℃ in advance and bake for about 25 minutes. Note: There may be differences in oven temperature, and it can be adjusted a few degrees appropriately.

Step 15 . After baking, remove the mold and place it on the cooling rack to cool down for a while.

Step 16 . Cover with a piece of oiled paper, flip it over and remove the oiled paper, then flip it over and let it cool completely.

Step 17 . When the cake is completely cooled, cut it at a 45 degree angle at the closing area to make it more round.

Step 18 . Whip 150g of light cream and 15g of granulated sugar until firm.

Step 19 . First, apply a layer of light cream evenly, then start rolling and pile the cream up into strips.

Step 20 . Close your mouth and hold it, then roll a rolling pin onto the oiled paper. Slowly roll it up and press it forward to form a circle.

Step 21 . Use a scraper to hold and tighten in a cylindrical shape.

Step 22 . Refrigerate in the refrigerator for 2 hours.

Step 23 . After shaping, it is easier to cut and look better.

Step 24 . Matcha marble patterned cake roll, completed O (∩ _ ∩) O

Step 25 . The appearance is interwoven with patterns resembling marble.

Step 26 . The interlocking texture of green and white is like a work of art.

Step 27 . The slight bitterness of matcha and the sweet cake shape complement each other, leaving an endless aftertaste.

Step 28 . Soft and delicate, with a rich and mellow taste that melts in the mouth, as if immersed in a tea garden, enjoying a fresh and natural atmosphere.
* Information is provided from the Internet, If there is a copyright infringement, Please contact administratoryouarefoodie.com, We will deal with as soon as possible, Thank you!
